Wednesday 30 October 2013

Animation Script Writing 2

Practiced some observational
drawing during the workshop.
Wednesday 30th October - Attended the second script writing workshop led by Mark Grindle.

Notes taken during the workshop:

Projects:
Just come up with a title! It is the audiences first clue about the film.
A 2 minute film is completely different from a 3-4minute film.

Character, storyteller and audience share the same logic - overlapping. Allows you to step into the character's shoes at will.

3 word to always come back to during script writing:

Power
- Protagonist can become the mirror of the antagonist
- Relationship between protagonist and the antagonist
- Relationship between story/character and audience, power over the audience, power of the storyteller
- See a film twice, 1st time just enjoy the film, 2nd time watch the audience and see their reactions to it, note down when and what reactions they had to the film, you can create a map of the film's story from this.

Desire
- What a character needs/wants/intent, their goal
- Define what position the character is in
- Let the audience decide what is right for the character
- Don't let the character know what they need, but let the audience know, dramatic irony. Let the audience know right from the beginning.

Destiny
- Messages in our heads to make us conform to something
- It's the ..."if you don't do that, ..."
- Always a sense at the end, the characters don't end there.


Who is the audience?
Characterize the experience of the viewer, how will an audience respond to your film? Attitudes and attributes boil down to what the ideal audience for your film would be.
Test story ideas with people. If it's a comedy, really test it with others.

Research & Writing - Abstract

Wednesday 30th October - Handed in the next written assignment for the Research Skills & Methods module. The task was to write an abstract based around the research we have been doing and describing the proposed work for Masters. Within this we were to write about the context within our project, key artists that we may be influenced by, and the perspective that we will be exploring within our own work. Also an explanation of the methods we intend to use was needed.

Through my own research for this, I referenced Ed Hooks book 'Acting for Animators', it has turned out to be one of the most useful books I have come across for learning about performance within animation. It looks at some of the key concepts that I wish to explore within animation, including acting, movement, realism and empathy: 

Tuesday 15 October 2013

Shoes and lens distortions...

First task of the day was choosing a shoe. It needed to be an old, worn shoe as it would be more interesting to model using polygons. I was going to go for a pair of my old Keds shoes but then I found my Dad's gardening shoes by the door and thought they would be much more interesting to model and texture! Whether it will be more difficult I'll just have to find out as I go along...


Set up a tripod and camera in the conservatory as I thought the light would be a bit better in there.


Went into uni to the Maya lab to use NukeX, to remove the lens distortion from my photos.
Opened the image of the shoe, and an image of a grid I took a photo of at the same time, into NukeX:

Grid with lens distortion

Grid without lens distortion
When the 'lens distortion' node is working with the Grid image, transfer the node over to the Shoe image:

Image with lens distortion
Image without lens distortion

The only problem I encountered when writing the final image out as a .jpg, was I kept getting this message pop up:
"nukex write1: can't rename .tmp to final, File exists/Permission denied"
If the file still saved it was an unknown file type. I couldn't find a way for this not to happen, but I found that by opening the unknown file type in Paint and then saving it as a .jpg worked... 

Photo with lens distortion

Photo without lens distortion

Friday 11 October 2013

Maya Polygon Modelling Introduction

On Friday 11th October we had a Polygon Modelling class with Jin. Here are my notes from the class:

There are 3 types of geometry in 3D applications:
- NURBS
- Polygons
- Subdivision


Remember:
- Reference images - take off lens distortion
- Take off lens distortion from default Maya cam (persp)
- Customize the Maya Shelf (ctrl + shift + LMB click to add tool to shelf)

35 to 80 for Focal length of default Maya camera.

NukeX (only 'X' has lens distortion tool):
- open images 'R', hit '1' to open in viewer
- hit 'tab' to find lens distortion node
- Grid analysis, Grid type - thin line, Analyze Grid
- 'w' to write, jpg, quality 0.75

To create image plane in Maya:
- Camera attributes in top view - environment - create image plane


- Select image plane and move down via attributes

- Do the same for top, front and side.

Creating a 3D shoe (example):
- Use 'create polygon tool' in "Mesh" menu to outline shoe in top view
- Use 'interactive split tool' in "Edit Mesh" menu to add lines across.
- There will be triangles at the top and bottom! Use interactive split tool to fix this.

- When deleting an edge, select the edge then delete Edge/Vertex from menu.
- Move side view plane up so it is in line with the object
- Extrude face up, hit 'G' to re-use tool
- Hold 'ctrl' to deselect faces
- In "Animation" menu - Create Deformers - Non linear - Bend
 Rotate the 'bend' and adjust the 'Curvature' in the attribute editor to add the bend in the shoe sole

- Build side of shoe
- Use 'Soft Modification Tool' to sculpt the polygons

- If Normals wrong?
 Normals - Reverse

- Make holes in the mesh by using the 'interactive split tool' to create a diamond shape, then delete the middle faces

 Use 'interactive split tool' again
 Move vertices to create a circle shape

- Add wrinkles - need triangular shapes, use the 'interactive split tool' and when object is smoothed the wrinkles will show
- Smooth, adjust in attributes, if wrong go back to '0' and delete history
- Duplicate side - with instance? So other side can be manipulated at the same time?
- Combine both sides - Mesh - Combine - Edit Mesh - Merge Vertex Tool
- Display - Polygons - Display Edges (to check vertex have merged)
before merge vertex tool

after merge vertex tool

- Insert edge loop tool - thinner spaces. sharper edge when smoothed

Remember to Freeze transformations!

Thursday 10 October 2013

Research & Writing - The Contextual Review

Amongst the main studio projects and 3D training, we have a Research Skills & Methods module. Our first assignment involved writing about 1 source (or more) in a Contextual Review. My research started in the library and using keywords such as "Animation", "Acting", "lipsync" and "film" to search for some books that might help me with this assignment; and ultimately help me towards creating a question title for my research that links back to my main Exploring Practice module in the studio. Here are the library books I borrowed:


Animated Performance by Nancy Beiman and Understanding Animation by Paul Wells proved the most useful for this particular assignment.

Our next task is Writing An Abstract, due for the end of October.

Wednesday 2 October 2013

VFX Camera workshop

On Wednesday 2nd October we had a workshop led by Malcolm Finnie, explaining how to use HD camera's for VFX filming. Here are a few notes I wrote down during the workshop:

Setting up camera (Sony EX1 - Full HD):

  • Auto + manual focus (switch to manual focus so orange ring is showing)
  • Zoom manual to zoom by dial
  • Manual Focus
  • Iris same as aperture (manual)
  • Aperture measured in F stocks (makes lighter/darker)
  • Smaller aperture - greater depth of field
  • Gain same as ISO on SLRs (controls noise + gain) - (low)
  • White balance

- All reset before beginning
- Monitor volume, turn back up
- Format media - deleting stuff off memory cards
- Video format - HQ 1920/25P
  (P for Progressive, I for Interlaced - for VFX use P)

When filming:

  • Peaking - an aid for focusing - coloured line around focused object
  • Exposure (what effects it): ISO/Gain, Iris/Aperture, Shutter
  • White balance by zooming into a neutral colour

Camera footage to computer:

  • Adobe Prelude CC to ingest
  • If the footage is not ingested first and you started editing the footage straight from Premiere and gave the camera back, when you go back to Premiere - none of the footage will be there anymore
  • 3D camera tracking in After Effects

Tuesday 1 October 2013

Animation Script Writing 1

On Tuesday 1st October we had an all-day class with script writer Mark Grindle. Some of the talk was familiar as he visited our class when I was in Undergraduate Animation. Here are some of the notes I wrote down during the day:

storytelling - how we make sense of the environment/people around us.

things to think about when script writing -
story
active questions
tone
theme

Character - 
How to get the audience to understand what the character is thinking?
The character has to need/want something - even if he/she doesn't know.
1 story per character - whose story are you concentrating on, for example, in a film?
All character's stories link to a central theme.
Less is more.
What is the character's desire?

Tradegy - don't get what they want
Comedy - do get what they want


'Poetics' book by Aristotle recommended.

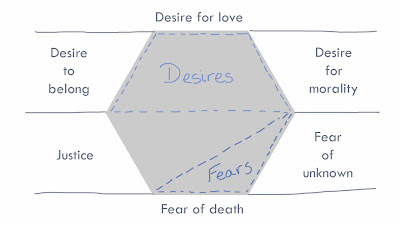
Themes (message/moral) - 
Here is a diagram explaining different themes:


---------------------------------------------------------
Task for next Script Writing workshop on 30th October:
Come back with something incorporating elements of today, a short story, told in 30 seconds or about 50 words long, to tell to the rest of the group. It should take around 30 seconds to tell and would make the audience/someone think/do/feel differently (justify with one or more of the elements above).