Showing posts with label Maya. Show all posts

Saturday, 10 May 2014

Going Live - Character Modeling

Used one of the concept designs I had done previously as reference for starting to model the Tree-Hand 'character' which captures the Eagle:

This is the first version of the model - unsmoothed:

First version of the model - smoothed:

Wireframe - I made sure to use topology techniques that would normally be used to model a 3D human hand, as the tree-hand will be animated, therefore it needed to have correct deformations. I added more edge-loops around the joints of the fingers/branches:

Tried adding a very simple rig to test quickly if the geometry was going to do what we need the Tree-Hand to do:


Realizing that the model will be smoothed, in order to retain the sharper edges to match with the rest of the paper world, I added in more edge loops for the edges of the fingers/branches and roots. Elongated the branch/fingers slightly to add a bit more creepiness to it and this will probably allow more freedom for movement and entwining as well. Also modeled the second hand/roots which is curving in around the main tree-hand, based on the original concept design:


Discussed with others in the team about the hand looking more tree-like before it 'grabs' the Eagle. I suggested maybe adding more trees/branches behind it. These could then be entwined with the hand and then fall away to reveal the hand. Or another suggestion was to just make the finger/branches more contorted and entwined with each other before unfolding to look more hand-like. So there were a few things to try next!

As the Tree-Hand model looked a bit more like a hand than a tree, some extra modeling was required.
For a very quick test I made copies of the branches/fingers and attached them behind the main model. This showed me that they needed to be smaller and more subtle:


Decided that smaller and thinner branches would look better:

The tree-hand starts twisted around and is first seen from the side in the film. This also helps to disguise the 'hand-like' shape:

Showed the Director, Kieran, the updated model and it was discussed that more branches could be added to the back of the hand and knuckles. When the hand is curled over to begin with, these extra branches will be stood up and also helping to disguise the hand as a tree. I modeled them at an angle as they will be moving with the hand, so when it curls over they will follow. If they still are not at the correct angle when the hand is curled, some extra joints will be added into these smaller branches to move them:


Turnaround of final 'Tree-Hand' model - I adjusted the model slightly for the turntable in order for it to sit flat (rendered and composited together by Kieran):

Thursday, 24 April 2014

Creating a Visible Rig in Renders

As we are compiling all of our Going Live work together for next week's presentation, I wondered if there was a better way to present rigs instead of just a screenshot. I searched for a way to make rigs visible in renders and came across a relevant tutorial and article. Link Here. I passed on this tutorial to others in the class to use for their rig renders also.
These are the steps I went through:

  • Press F6 to go into Rendering mode.
  • Select curve.
  • Paint Effects - Curve Utilities - Attach brush to curves.
  • Look in attributes, turn on 'Forward Twist'.
  • Work way through all Nurbs curves.
  • Select all 'strokes' in Outliner.
  • Paint Effects - Share one brush.
  • Attributes - change Global Scale to one.
  • Modify - Convert Paint Effects to Polygons.
  • Ungroup brushes in Outliner, delete the strokes.
  • Group all the brushes and rename to 'Rig Visualisation'.
  • Center Pivot, Freeze Transformations and Delete History.
  • Hide Nurbs curves.
  • Hypershade.
  • Create and apply coloured shaders.
  • Select all shapes of same colour and apply shader.
  • Select F3, quadrangulate in polygons menu for shapes.

To make the Visible Rig move with the actual rig:
  • Group all rig geometry and parent to Global Control.
  • Select Nurbs control, turn visible rig back on, select rig geometry, then Parent Constrain.


For rendering, I created an Ambient Occlusion layer:

I rendered out the rig on a layer by itself with some directional lights surrounding it:

I then composited these together with a background in After Effects:

Followed the same process for the view of the back:


Thursday, 5 December 2013

Nurbs Rendering

Added the whole Nurbs environment scene into a new render layer, created a surface shader with mib amb occlusion for the Ambient Occlusion render. Here are final renders of the scene:


Created a camera and animated it, rendered out as .tif frames, imported as a .tif sequence into After Effects and then rendered out the final video:


Nurbs Modelling

After taking multiple photos from all around my kitchen, I decided to model the kitchen desk study area for the NURBS project:


The first step was to create an image plane for quick reference when modelling, then I created Nurbs planes to set up the walls and shape of the corner of the room:


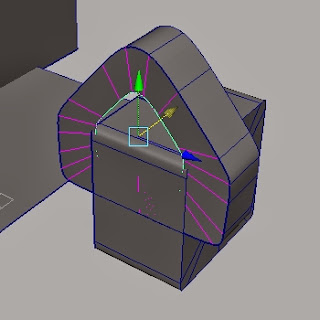
Then for the bookshelf I took a Nurbs Circle and snapped points together to create a square shape:

I then duplicated the curve and scaled it in, selected both curves and 'Loft' together:

The inner curve is scaled until it is too small to see:

The outer curve is duplicated and moved across, both selected and 'Loft' again. The object is then scaled to fit into the wall space, the small cube shapes holding the bookshelf were created in the same way:

For the table top this was created in much the same way, then I selected Vertices around the edge and scaled out to add a slight curve to the edge of the table:

The table legs and chairs were created in the same way, creating curves, duplicating, loft and scaled. The side of the chairs are curved slightly back, this was done by selecting relevant vertices and translating them:


Curves created for the cloth hanging over the chair:

Loft between them:

Right click and select 'Isoparm':

Hold 'Shift' and drag additional isoparms from the edges, then 'Insert Isoparms' from 'Edit Nurbs' menu:

Select 'Control Vertex' to translate points around to replicate the natural cloth shape:

Using the 'CV Curve Tool' to draw out the silhouette shape of a pin head:

With the curve selected, go to 'Surfaces' menu and select 'Revolve':

Created a Nurbs cylinder for the pin point to finish the pin for the noticeboard:

Added a variety of lofted surfaces and planes in different sizes for the paper on the noticeboard:

Photo frame on the opposite wall created by duplicating the noticeboard frame and using 'Control Vertex' to adjust the shape:

Creating a nail for the noticeboard to hang from, created in the same way as the pin:


For the ring shape to hang over the nail, I drew a curve shape with the CV Curve Tool and the created a nurbs circle, I then snapped the circle to the end of the curve at a 90 degrees angle by holding 'c' and middle mouse dragging the circle over the curve:

Select the circle then the curve, 'Extrude' along path as a tube:

Scaled and positioned in place above the noticeboard:

Curve drawn for the skirting board along the bottom of the walls:

Duplicated curve and loft:

Positioned around the bottom of the walls:

Same process for the door frame skirting:


For the tiles mounted on the wall, created the tile mount in the same way as noticeboard ring plate:


The box on the bookshelf had a whole in the front of it. To create this I positioned a nurbs circle in front of the box and used 'Project Curve on Surface':

I then used the 'Trim' tool to delete the circle shape in the middle, and extruded the middle through:


The 'Round Tool' created a rounded edge around the circle joining to the middle section:

Rest of the box sides:

Books on the shelf created in the same way as the shelf and scaled and rotated differently:

The bottom of the cupboard was created using Nurbs cylinders:

The Sellotape was a more complex shape so I drew the silhouetted shape out with the CV Curve Tool, duplicated and loft:

The sides were duplicated, loft and scaled in:

Projected a Nurbs square through the top:

Used Nurbs cylinders to create the sellotape wheel:

Duplicate curve and 'loft' to close the inner part of the wheel:

Side view:

Drew out and created the shape for the tape, also added parts to the inner part of the wheel:

Creating another piece for the front of the sellotape dispenser:

Starting to create the shape of a plug:


Projecting curve onto side of plug and trimming:

Creating the same sized shape that is concave:


Projecting curve shape onto front of the plug:

Made the same sized shape to fit into the hole created, projecting and trimming smaller shapes on the sides:

More parts of plug added:

USB part at the back of the plug:

X-ray shading to see inside the plug:

Drawing out path for the wire:

Screws for the chairs:

Screws added to the chairs:

Box of tissues:

Mug on the table using 'Revolve' and extruding circle along a path:

Finished Nurbs environment wireframe:

Added the Nurbs Curves to a separate display layer to turn on and off the visibility when needed:

Everything named and organised into relevant groups in the Outliner, this avoided confusion during the modelling process and allowed for me to easily translate, revolve and scale an object that was made up of multiple parts:

Outliner expanded: