Monday 16th June
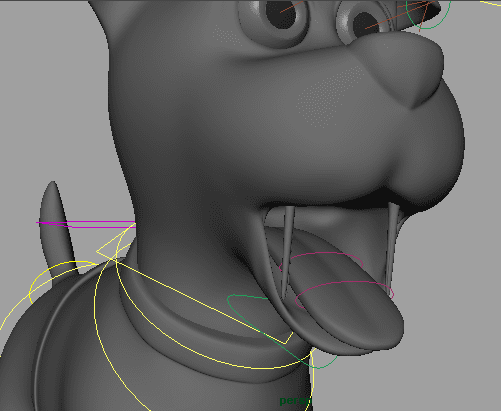
Working on blendshapes for the dog today:
 |
| Smile! |
Later on I did some research for the film's soundtrack and searched the web for examples and inspiration. Found some music on the website SoundCloud - was looking for ukulele style music:
This piece had quite a good background music sound to it, not as upbeat, maybe good for parts of the film where there's more tension between the characters:
This one I thought was a quirky and upbeat piece of music. I also quite like the whistling in it, which almost sounds like the bird making fun ad being mischievous:
The middle of this tune has a part where it is just ukulele:
Credit music? Half way through this piece it is just acoustic (no xylophone), maybe a mixture of acoustic and ukulele would work:
Tuesday 17th June
Had a team meeting to discuss the soundtrack of the film:
We each brought in some examples, either edited to the animatic or links to pieces of music online.
Georgios found this piece of music which we all thought suited well with the film, but just the first 10 seconds with a banjo:
We all agreed that there should be a dramatic pause when the biscuit is stolen, and more upbeat music at the end.
There should also maybe be a change in pace of the music during the Tug-of-War fight scene.
Think we need to find someone to re-create the music for us, so that it is timed to the film and the story beats.
Also discussed what we are all working on at the moment:
K = Making the environment less heavy and looking at IBL.
S = Textures - fix Owner's ear muffs texture, and finish the Bird's textures.
G = Human rig.
L = Finish Dog blendshapes and move the Dog rig over to the new uv-mapped Dog. Advising Kirti where to downsize the environment file.
Had a look over the Bird rig Georgios has been working on - the tail needs some rotation so it isn't so straight. Suggested using blendshapes to help solve these: Closing beak fully; moving feather on top of head; curling toes.
Took screenshots of the new environment with the animatic shots to evaluate where the environment can be downsized and if there are any changes to be made:
 |
| Shot 3 |
 |
| Suggested making the background houses geometry more simple, so that there are less polygons in the scene. |
 |
| Shot 6 - Suggested the addition of more bushes and plants behind the fence in the neighbours garden so the audience can't see through as much of the fence. |
 |
| Tried moving some vertices around on the bushes that surround the garden to make them more grown in and less straight. |
Also decided it would be best to remove all the paint effects plants as they were slowing the file down and did not quite fit in with the look of the rest of the environment.
Wednesday 18th June
Had some technical support provided by Sang today in the studio. Asked about transferring weight paints from one model to another and was shown how to export and import weight maps.
Also as I should be starting to animate the dog soon, I asked about walk cycles. First they can be created on the spot, then imported into a scene and use the global control to key them from A to B, adjusting frames if needed if there is a case of sliding feet on the ground. He also mentioned using animation layers, to add details and variety on top of the walk cycle, such as making the dog turn it's head whilst walking.
Will definitely be looking into animation layers as this is something I haven't used before.
Sorted the dog Outliner out. Opened up the file which had the rig binded to the model to look at how the Outliner was arranged and named. Went back to the new file and renamed and ordered everything to match the old file, which should help avoid confusion, keep the file clean and organised, and make it easier for Giorgos to re-bind the rig to the dog model:

Created some more blendshapes for the dog:
 |
| Mouth-Sad |
 |
| Mouth-Grrr-Left |
Realised the part of the film I had figured out where the dog would be grrr-ing, it was actually the other side of his face that would be seen. So I created a Grrr Blendshape for the dog's right-hand side. Then I realised that I had duplicated the main head with his angry eyebrows blendshape switched on, so this blendshape was created:
 |
| Mouth-Angry-Grrr-Right |
Decided to keep it in case it will be of any use, at least the angry eyebrows matches with the grrr mouth!
Created a grrr mouth blendshape with just the right-hand side as well:
 |
| Mouth-Grrr_Right |
Tried to use the Blink blendshapes I had created with the old version of the dog, but they don't appear to work with the new model, will try to re-apply them after the rig has been transferred to the new dog.
Thursday 19th June
Supervisor meeting with Sharon:
- Sort out who will be animating which shots
- It's maybe an idea for one person to take charge of one character, this will allow that person to be familiar with the rig and produce a higher quality of animation. May also contribute to a more efficient pipeline.
- Quick discussion about the soundtrack and who might be able to help with that. Getting the soundtrack done will help with animation timing.
- By next meeting in 2 weeks, all characters should be rigged and moving with initial tests. Have a rough soundtrack to the animatic.
Had a quick look over the environment and made some suggestions to Kirti about the position of plants in the garden to not look symmetrical and be a bit more grown in.
Gave files to Georgios to rebind dog rig to the model.
Then went off to a Graduation celebration all afternoon!
Friday 20th June
Tried to export and import the skin weights for the Dog again, but no luck. So I tried a different method:
I imported the dog with the correct skin weights into the file with the incorrect skin weights Dog, so that they are in the exact same place. I then selected the body mesh with the correct skin weights, shift selected the one I wanted to copy the Skin weights to, then selected 'Copy Skin Weights' from the menu, and it appears to have worked!

However, then the old version of the dog's head was not combined with the teeth, so copying over the weight paints to the new dog produced... Vampire Dog!
I tried copying over just the teeth wight paints but that didn't work, so I just analysed how the teeth were weight painted on the old version and reproduced this by hand on the new dog. Vampire Dog no more!

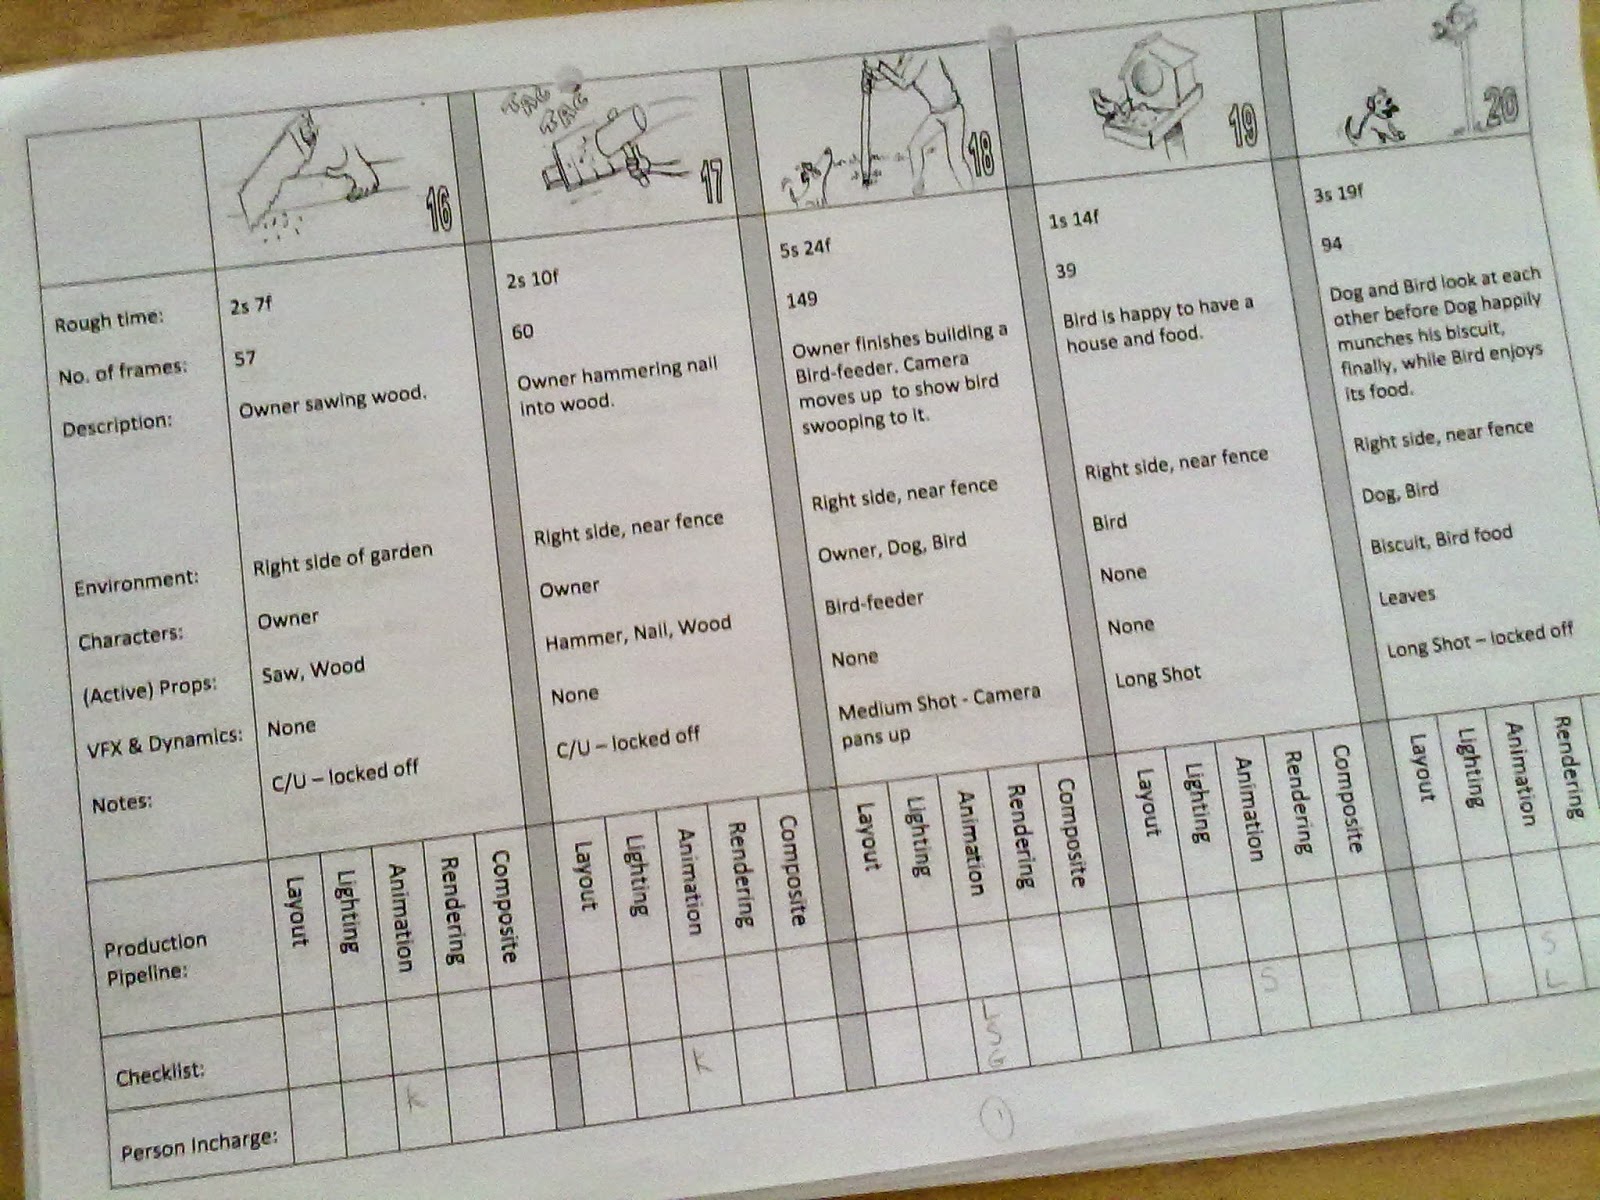
Team meeting to discuss the Shot List:
Discussed who would like to be in charge of which character for the most part, as discussed with Sharon yesterday. I will be animating the dog, Georgios will be animating the human, and Sheng will be animating the bird.
We then went through the shot list, again based on Sharon's advice, we picked out shots mainly from the beginning and end of the film to animate first, as these should be good quality animation. We wrote down our initials as a reference so we know who will be working on each shot (in pencil as they may change/be given away to someone else to animate depending on time):
The collaborative scene we will all be working on is Shot 18, which will also prove to be a good test at bringing in animation from different people into one shot. This shot will include Dog, Human and Bird animation:

We also decided that any shots which had more than 1 character interacting which would be more difficult to split would just be animated by one person. For example shots 13 and 15 where the human is holding onto the dog.

In shot 11, the dog and bird are in a Tug of War with the biscuit, so they will also be animated together by one person, however someone else can animate the Human who is standing in the foreground separate from the action.

One of the first things I would like to start animating is the Dog walk/run cycle, which will then be able to be used in many of the scenes.

Weekend
Had blendshapes for dog to finish and work out.
Re-done the Blink blendshapes as importing the previous ones was causing parts of the dog's face to twitch... After I applied the new ones and tested the scale, all the previous blendshapes were working fine apart from the new ones - the Blinks!
 |
| A terrifying sight... |
For the Full Blink, I had to create a half-way Blink as just the full one was going straight through the eye from it's starting position to it's finishing position (as the eye is very round and sits out of the socket a little way). This half-way Blink helped out. I created a Blend which includes both of the Blendshapes by ticking the 'In-between' box:

After looking through a few cartoon dog examples, I thought a Nose Scrunch blend would be a nice addition for when the dog is sniffing, happy, growling etc. These are the drawings I looked at in the book Disney Dogs, the nose scrunched is included in quite a few of the expressions:
 |
| Disney Dogs - p.58 |
 |
| Disney Dogs - p.70 |
Here is the nose scrunch blend I created for our Dog character:
 |
| Nose-Scrunch Blendshape working with blink and smile blendshapes |
For re-applying the blendshapes, I organised them in a more convenient way. They are now grouped together, such as an Eyebrow group and a Mouth group. They were all applied in parallel so work with each other:

I also checked the input list to make sure everything was in the correct order and all blendshapes work with each other:

Also cleared up my laptop files to make some room, as it was rapidly running out of space! Wishful thinking that it will make my laptop literally lighter though... :/
No comments:
Post a Comment